PC5 Solar Charger - for your iPhone, iPad or iPod

Solar Charger for Electronic Devices


One thing that has been on my mind lately is how do I keep my electronic devices powered up when SHTF and the power grid goes down. Something that will work is a PC5 USB solar charger on Amazon made by Suntactics. The size of a CD case when opened, this well built device uses the sun to keep your phone/GPS working far from home. Am also looking into getting some Sanyo LSD AA batteries and a USB charger that plugs into the PC5 so I can keep my emergency weather radio working as well. These new LSD rechargeable batteries are great because they will hold their charge for many months and even years. Plus they can be recharged 1500 times.

Unlike some of the low cost solar chargers on the market, Suntactics made the PC5 to very high quality specs and uses a top of the line solar crystal. This unit will even charge at a reduced rate through a car window. Now we can still enjoy our iDevices when camping or ISHTF.

Garmin Forerunner 405 Water Resistant Running GPS With Heart Rate Monitor

Garmin Forerunner 405 Running GPS

When the stress of a disaster happens, this device will monitor your heart rate and with built in GPS monitor your distance traveled.


Product Description
GARMIN Forerunner 405 ANT S Green GPS Enabled Sports Watch. Garmin International is pleased to announce the new Forerunner 405 GPS enabled sports watch. This sleek sports watch tells you how far, how fast and when you are in your heart rate zone. The Forerunner 405 can be used indoors or out, when you are outdoors you can use the built in high sensitivity GPS receiver for your training, plus with the new touch bezel you can scroll through menus on the run. While indoors you will be able to use the ANT plus Sport wireless technology to connect to an optional foot pod to measure speed and distance when indoors. Users can upload data to Garmin Connect a new web based application which lets users analyze data with interactive graphs that chart their pace, time, distance and heart rate. The Forerunner 405 will be offered in two different colors black or green.... More >>

Garmin Forerunner 405 Water Resistant Running GPS With Heart Rate Monitor and USB ANT Stick

Tornado Proof Storage Tube

Tornado Proof Storage Tube

Mark Schiefelbein/Associated Press
Joplin shows us another demonstration of the fury and destruction Mother Nature can rain down on upon us in just a matter of minutes. Tornado's do not leave us much to survive with. Best bet is to have some type of under ground cache if you live in tornado country. A storm cellar would have saved many lives and should be mandatory for all new construction in tornado prone areas of the country.

You can easily build your own affordable underground bug out storage tube to keep emergency supplies safe and ready when you need them. Start by using a large 4-6"diameter PVC pipe. Glue a cap on one end and on the other glue on a clean out fitting with a screw cap. Be sure to use Teflon tape and even pipe sealant on the threads to keep moisture out. Throw in a couple of dry packs and store your items in dry bags. When hiding your cache, make sure you know where to find it. Many landmarks may no longer be visible after a disaster strikes. It's a good idea to bury a set of channel lock pliers in a double zip lock or small dry bag nearby to get the cap off.

SE 11 Function Credit Card Size Survival Tool Pocket Size

Credit Card Sized Survival Tool


  • Thick-gauge, extra-durable stainless steel construction for practical force application
  • Features 11 tool functions including a can opener, knife, screwdriver, ruler, bottle opener, file
  • Practical multi-tool the size of a credit card--fits in wallet, pocket, purse or glove-box
  • Includes protective PVC carry-case for wallet or purse and a handy tool identification card
  • Saw blade, 4-size wrench, nail puller, directional indicator, key-chain hole
Product Description
Guaranteed brand-new and factory fresh. This shrewd, clever little credit card-sized tool fits easily into a wallet, pocket or purse. Genuine stainless steel construction that is just thick enough for practical use, but not so heavy as to be cumbersome. Simple, and durable, this small wonder really does what it is supposed to do! Credit card-size multi-tool is packed with features: 11 functions in one steel survival tool. A knife edge, a cap opener, a can opener, a mini saw blade for cutting small tree branches, a ruler-measure scale, a beveled corner screwdriver, and a 2 and 4 position wrench. It has 9 tools less than a Swiss Army Knife, but try fitting the knife into your wallet! This tiny multi-tasker can really come in handy. The compact size allows it to be stored anywhere without adding weight. This is really an inexpensive, pocket-sized insurance policy for when things do not go as planned. Toss one of these into the map case, car glove box, the boa... More >>

SE 11 Function Credit Card Size Survival Tool Pocket Size

How to Make Gun Powder


Disclaimer: I am in no way responsible for what you do with this information. This information is strictly educational. If you use this information for purposes other than educational, you do so at your own risk.
There may come a time when knowing how to make gun powder could come in handy in an emergency situation. There are three main ingredients in gun powder: potassium nitrate, charcoal, and sulfur. Here is a list of materials you will need.
         3 cups of granulated potassium nitrate
         2 cups of powdered charcoal
         ½ cup of powdered sulfur
         10 cups of rubbing alcohol
         3 cups of water
         2 two gallon metal buckets
         1 metal window screen big enough to fit on top of your buckets
         1 large wooden spoon
         1 old T-shirt
         A heat source
The amounts above will produce 2 pounds of gun powder. Below is a step by step guide for making gun powder using the materials listed above.

1. Mix 3 cups of potassium nitrate, 2 cups of powdered charcoal, 1 cup of water, and ½ cup of powdered sulfur in one of the metal buckets. Mix the ingredients together thoroughly.

2. Add 2 cups of water to the mixture and begin heating. Heat the mixture while stirring until it starts bubbling.

3. Pour 10 cups of alcohol in the unused metal bucket.

4. Take the mixture of potassium nitrate, charcoal, and sulfur off of the heat and pour the mixture into the bucket with the alcohol while mixing vigorously.

5. Let the mixture sit for 10 minutes.

6. Take your old t-shirt and secure half of it over the now empty bucket. Pour the alcohol mixture through your t-shirt filter.

7. Discard the liquid in the bucket. Take the powder that is left on the cloth and squeeze out the rest of the liquid.

8. Dry your empty bucket with the rest of your t-shirt.

9. Place the screen over the dry empty bucket.

10. Push the damp gun powder through the screen.

11. Take the powder that has been pushed through the screen and spread it out thinly on a clean dry surface free of debris. The mixture should be dried as fast as possible. The longer the mixture takes to dry the less powerful the gun powder will be.
gun powder is dangerous and caution should be used when handling it. Store your gun powder in a moisture proof container away from sparks and heat.

Great SHTF Survival TV Series - The Walking Dead

Great SHTF Survival TV Series - The Walking Dead


    The Zombie Survival Guide: Complete Protection from the Living Dead

    Product Description
    The Zombie Survival Guide is your key to survival against the hordes of undead who may be stalking you right now. Fully illustrated and exhaustively comprehensive, this book covers everything you need to know, including how to understand zombie physiology and behavior, the most effective defense tactics and weaponry, ways to outfit your home for a long siege, and how to survive and adapt in any territory or terrain.
    Top 10 Lessons for Surviving a Zombie Attack
    1. Organize before they rise!
    2. They feel no fear, why should you?
    3. Use your head: cut off theirs.
    4. Blades don’t need reloading.
    5. Ideal protection = tight clothes, short hair.
    6. Get up the staircase, then d... More >>

    The Walking Dead

    If you have not yet watched AMC's new hit thriller The Walking Dead, be prepared to be thrilled! This is one of the best zombie thrillers I have seen in a while. IMDb gives it a 8.9/10 with 32,000 votes, enough said.

    What makes this series great, the survival storyline is very very believable. If this series does not have you stocking up on guns and ammo, I don't know what will.

    Season one is over and the the only way to view it now is to Tivo the reruns, buy the series or watch it on Netflix.


    How to Start a Fire with a Magnifying Glass


    A magnifying glass should be a part of everyone’s survival kit. The great thing about a magnifying glass is that it can be used over and over again. On dry sunny days it makes no sense to waste your waterproof matches, magnesium strip or other fire starters. You will only need to gather some basic items to start a fire with a magnifying glass. You will need some dried out grass, cattail, or any other easily combustible material. You will also need some pine straw or leaves. Gather some pine and hard wood twigs and gather some bigger pieces of wood. Hard wood will burn longer than soft wood, but soft wood is better for starting the fire.

    1. Form your dry grass into the shape of a birds nest.

    2. Focus the suns light through the magnifying glass. The focused light will appear as a very bright small dot. The pile of grass should start to smoke immediately. Keeping your light focused work around in an outward circular motion slowly. It should take about two minutes to catch on fire. It may take longer than two minutes so be patient if it does not ignite quickly.

    3. Once your grass or cattail has ignited place the pine straw or leaves on top. The leaves and pine straw should combust quickly.

    4. You are now ready to add your twigs make sure you do not smother your fire or it will go out. Cross the twigs leaving gaps for the fire to breath.

    5. You can now start adding bigger pieces of wood to your fire.

    When making a fire in the woods make sure to clear a five to ten foot radius around your fire area to avoid catching debris outside the area on fire. Below is a quick video tutorial. Be sure to properly extinguish your fire as it may reignite later.

    How to Make Smoke Bombs


    Disclaimer: I am in no way responsible for what you do with this information. This information is strictly educational.

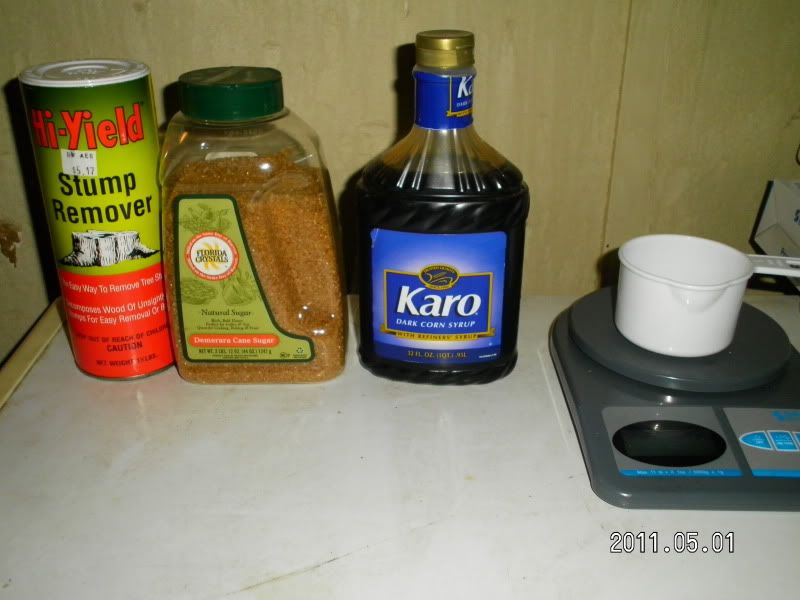
    There may come a time in an emergency situation that you have to make a daring escape. The use of a smoke screen can greatly increase your chance of escape. There are four main ingredients you will need to make a smoke bomb. You will need potassium nitrate, natural cane sugar, dark corn syrup, and water. You will also need a scale capable of measuring in grams and a plastic cup. A fuse and cardboard tube will make a more professional product but is not necessary. You will need a sauce pan that you don’t mind ruining and a wooden spoon.


    Hi- yield stump remover contains 99% potassium nitrate. Just make sure you don’t get the liquid stump remover. You want the round pellets. You can also purchase potassium nitrate online.

    Natural cane sugar can be found in any grocery store. For any reason that you cannot find natural cane sugar you can substitute it for regular sugar.

    Dark corn syrup can be found at the grocery store. If you cannot find dark corn syrup you can substitute it for light corn syrup.

    1. Measure your plastic cup.

    2. Measure 30 grams of potassium nitrate. Make sure you take into account the weight of your cup.

    3. Pour the 30 grams of potassium nitrate into the sauce pan.

    4. Measure 25 grams of natural cane sugar. Make sure you take into account the weight of your cup.

    5. Pour the 25 grams of natural cane sugar into the sauce pan.

    6. Add two drops of the dark corn syrup into the sauce pan.

    7. Pour one cup of hot water into the sauce pan. The amount of water does not have to be precise. The water is only to dissolve the potassium nitrate and sugar and will be cooked out of the mixture.

    8. Heat the mixture just under a boil. You might have to gently stir the mixture to get the potassium nitrate to dissolve. It will take about 30 to 60 minutes to cook the water off. Eventually the mixture will change into a paste. Once it starts to turn into a paste you will want to turn the temperature down to about 250 degrees. Continue to cook it until all the water is out of the paste. Consolidate the mixture into the center of the pan. At this point take the mixture off of the heat. Give it a few minutes to cool it will be extremely hot. If you are using a cardboard tube you will want to put the paste into it at this point. Pack the mixture down with the back of your spoon. Insert your fuse about half an inch into the mixture. If you are not using a tube, form the paste into a cylinder shape. The paste will start to harden once it cools.

    Your smoke bomb is now finished. This smoke bomb will put out a think dark cloud of smoke. If you are lighting the mixture without a fuse it will take about 30 seconds to catch on fire. Once it catches on fire it will burn violently. Make sure it is in a safe location that will not start a fire. For a white smoke substitute the natural cane sugar with white table sugar and substitute the dark corn syrup with clear light corn syrup. This mixture is hygroscopic, meaning that it absorbs water. Make sure you store it in a dry location or it will not function properly.