BEAM Head (Version B)

I have completed (with the help of my friend Matt) the mechanical platform for my BEAM Head (Version B). It was milled by Matt on a Hurco CNC Milling Machine. I showed up with my two gear motors and some ideas and Matt really took it from there. Here are pictures of what was created.


The motor that I am using seems to be widely available.
I got mine from BGMicro.

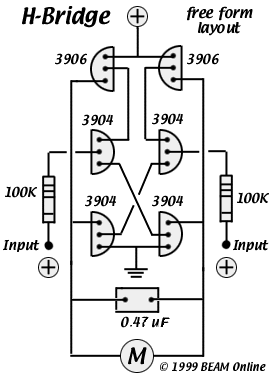
The following driver and sensor circuit has been breadboarded - it contains 3 parts:

  • signal sensing circuit
  • signal inverter
  • h-bridge
The final product is shown in this video. It is fully autonomous and tracks the brightest object in the room. If the light source contains enough energy, it will charge the onboard batteries. There is a small on-off switch to shut down the system, still allowing charging.


PIC Micro Programmer

The idea of programming small micro-controllers has been an interest of mine for a long time. Microchip makes a number of small micro-controllers, and after some studying on the topic, my target chip had become the 16F628A. This chip has 8 I/O pins, plenty of program memory for a guy like me and is in a small package (18-DIP).


After doing some research and a failed attempt to make a programmer kit that came with a book I purchased from Barnes and Noble, I decided it was time to make my own. I found a simple programmer developed by Byron Jeff - the Trivial Low Voltage Programmer (TLVP). Here is my version of that programmer (which works well).


The programmer uses a 9V batter and a LM7805 voltage regulator as a supply power to the 74HCT573 Octal D-Type Latch. This chip is used to buffer the data from the PC's parallel port to the target micro-controller chip. I put the components on a perf-board and added a switch to turn the power on and off.

Pinewood Derby Car


My son attends AWANA at our church. Each year the kids have a pinewood derby race where they compete for both the fastest race times and the best design. My son and I teamed up (as is encouraged by the AWANA organization *grin*). After discussing different options, he decided he wanted a sleek racing coup with headlights and tail lights.


We did some sketching and came up with a fast flat body, a canopy (made from the side of a liquid soap dispenser), and some headlights and taillights made from LEDs. The two AA batteries are inset and housed under the canopy.
.
.


His car performed fairly well in the race and much to his joy it placed 1st in the Design Competition.


A very proud Paul with his trophy and winning car!

Floor Lamp


My father-in-law could use a new floor lamp for Christmas, so with some persuasion from my wife, I decided to make one for him. Earlier in the year he had given to me (as a birthday gift) some rough cut hickory. This summer I planed it down and I was just waiting for the right project. After buying a lamp shade at Target and some electrical supplies from Lowe's, I had everything I needed to build the lamp.


It has a wooden handle connected to the pull chain of the light fixture to make turning the light on a bit easier and a little more unique.

Sump Pump Monitor

We have have an extremely active sump system. At times during strong rainfall, our pump may actually stay on as it pumps the water out as fast as it comes into our sump pit. I found myself forever going down to the basement to look into the pit and see how deep the water was. Also, after installing a backup pump (yes, I learned the need for that the hard way), I also was forever checking to see which pump was running.

Eventually after growing tired of peeking about my sump pit, I decided to create a monitor that would both determining the depth of the water in the sump pit and indicate which (if either) pump was running. My first challenge was to create the depth sensor.


I used a capped piece of PVC pipe with stainless steel bolts spaced every 2 inches. I then wired those from the inside of the pipe to a DB-9 connector.

Transistors amplify the signal from each sensor in the pipe. Those signals are then used to light LEDs on a monitoring panel.

I also built a current sensor by wrapping 12 gauge shielded wire around a 1/2 steel core (I cute the head of a lag bolt). Then, I attached a small hall effect device to the end of the core to sense a magnetic field. Each time a pump draws current through the coil, it produces a 60Hz magnetic field that is sensed by the hall effect device. That signal is then filtered using a filter capacitor and then used to light an LED. Here is a video of the prototype current sensor.


Here is a video of the finished monitor panel working. It is both monitoring the depth of the sump pit and also monitoring the pumps.


Automated Nightstand

This was an attempt to declutter our bedroom. I had grown weary of the clutter next to the bed and decided to make a nightstand that matched the ALF Group bedroom set we purchased from Italy. In this hybrid project, I combined woodworking, mechanics and electronics to create a nightstand that hid away our clock, X10 light control and any other clutter that potentially could pile up.

Microswitches inside the front panel of the nightstand control the raising and lowering of the hidden compartment. A relay is used to electronically lock into the raise and lower modes even after the microswitches are released. The top is mounted in a break-away fashion for safety (we don't want anyone to lose a finger). The linear actuator installed in the rear of the nightstand raises the top with its overrated 500 lbs capacity. The linear actuator uses internal microswitches to control the start and stop positions of the top.

Here are some videos of the nightstand during construction and the finished product.


BEAM Phototrope


My second effort in BEAM Robotics has been the creation of a Phototrope Photophile. Phototropes are small BEAM-bots that respond to light and are mobile. This phototrope is attracted to light, so it is a photophile (verses a photophobe which fears light).


This photophile uses a two photopopper circuits. Photopoppers are a store and release circuit that uses a capacitor to collect electricity gathered by the solar panel(s). A flashing LED (FLED) is used to determine the threshold at which the capacitor is discharged into the motor(s). FLEDs have a unique attribute in that they function less efficiently when exposed to light, allowing the photophile to respond directionally to light.


Here's a video of the little guy working his way across the tile entry in our house. This video is taking in late December - so the sun's angle is at it's lowest. I've bent his bottom down a bit to give him a better angle of attack towards the sun - it helps a bit but his is a somewhat slow mover (as you will see).


BEAM Head (version A)

I have been captivated by Mark Tilden's BEAM Robotics cult-like following and decided to join the many people that have built a BEAM-bot. My first BEAM project was a 1D Squirmer Head. For those of you that are not familiar with the BEAM movement, that may seem to be odd terminology.

Here are some links to help you learn more about BEAMing (if your interested):

Here are some pictures of my Squirmer Head:


Like all Squirmers, this BEAM-bot is stationary. The head is solar powered and requires no batteries. It's goal in life is to look for the Sun and track it. It has three basic parts:
  • Motor that drives the head movement (this is the M (mechanical) of BEAM).
  • Tilden H-Bridge motor controller that changes signals into directional movement (this is the E (electronic) of BEAM).
  • Solar panel and light sensors to power from and look for light (this is the B (biological) of BEAM).


Here is the circuit I used to build my version of the head. The design is actually quite inefficient - this is not a smoke-less H-Bridge design, so if both photo transistors allow current to pass through them, the circuit is effectively shorted out through both sides of the H-Bridge. I have come up with a design that is smokeless and hope to be putting that into a new head soon.

Also, the A of BEAM stands for "aesthetics". I hope you find this BEAM head to be handsome. :) Here are some additional pictures.

Would you like to see this little guy in action? Check out this YouTube video of him tracking a lamp.